How much do these colours make you think of spring?! They are making me so very happy, and I'm even happier with this finished, ice cream coloured, crochet tissue box cover. Tissue boxes are a bit of a catch-22 aren't they, you need 'em around in the winter but they really aren't pretty to look at (unless you're happy to spend more on a fancier box, which I'm not…). So after a few months of eyeing the ugly tissue box on my beautifully painted white and yellow bedside table, it struck me that I could crochet a reusable cover for it!
I can't remember if I checked ravelry or pinterest first but you can find this free pattern by The Royal Sisters blog on both, here's the link. It was super quick to make, easy enough for a beginner and hardly used any wool. I decided to leave off the scalloped edge as it seemed to fit the tissue box nicely without it and I wanted the pastel colours to do all the talking. I also purposely decided to do the opening and first two rounds of treble crochet in white to camouflage the tissue a bit.
Wool - Robin double knit in white, yellow, spearmint and peach. Special by Stylecraft double knit in silver.
I'm now wondering what else I can hide with some ice cream coloured crochet… our wi-fi box, next door's satellite dish perhaps? What would you cover in crochet?

TWITTER | BLOGLOVIN' | PINTEREST | INSTAGRAM | RSS
How to make planning your next room redecoration easier
Planning to redecorate a room in your home can be both really exciting and really stressful. Who else gets that eekitsalltoomuchidon'tknowwheretostart feeling? Where you have so many ideas, thoughts and things to remember it's completely overwhelming and you end up distractedly browsing a few websites then panic a bit and give up. Not the most productive use of time, but this was about as far as I kept getting with the plans to redecorate our new bathroom. So I sat down and came up with these tips to make the whole process easier, quicker and less stressful. Seriously, they’ve opened my once-disorganised eyes. I’ve written the tips with a bathroom focus, but you could apply to any room or redecoration project.
1. Work out what you want to achieve with the redecoration
Is it just a new look? Or do you also want to create more space? How about more storage? Pinpointing this will help focus the rest of your ideas, and will ensure by the end of the project you achieve what you set out to. For our bathroom redo we want to achieve more space, more storage and make the room feel brighter.
2. Gather inspiration
We all know I'm going to mention Pinterest here, but I do find Pinterest can sometimes be a bit overwhelming, too much inspiration, you know? For example, my bathroom board is full of characterful country bathrooms and roll top baths (neither of which are suitable for our current tiny bathroom) as well as the more realistic small space ideas I've gathered since thinking about the project. So either set up a new board specifically for your project and keep all the roll top pics for the next house, or print off and create a mood board of all the relevant pictures. You might be amazed what it suddenly shows you when all the most appropriate stuff is in one place... clearly our bathroom will be blue and white!
3. Samples, samples, samples
Nothing helps you make a decision faster or reduce risk of costly mistakes than getting in some actual samples. Lots of online stores like Victoria Plumb and Tile Mountain offer free samples, or you can buy samples of tiles, flooring and paint from most DIY stores for a few pounds.
4. Take measurements and keep them to hand
What's the point of thinking 'oh that might fit' when out shopping or browsing online, when you could check the measurement and know for sure? Measure the whole room and keep them in your handbag or on your phone, it's a massive time saver. Also if you're tight on space like our bathroom is, draw the measurements out to a small scale onto some graph paper and you'll be able to see exactly what space you'll have to work with.
5. Get a rough budget in place
In a similar way to tip 4 once you have a rough budget you'll know what you can afford and decision making will become easier. Fallen in love with some expensive wall tiles? Then you'll know you might have to economise on the flooring, or find a cheaper shower. Keep a running total so that you can assess and readjust as necessary.
Right, if you've done all that you should be feeling far more decisive and in a much better position to get on with the project! I’ll keep you posted on our bathroom progress.
TWITTER | BLOGLOVIN' | PINTEREST | INSTAGRAM | RSS
Rather than rushing head first into this new year, new projects thing (unless you count redecorating our bathroom, but more on that in another post) I've first promised myself some time to finish all the little projects, you know the ones, the half stitched cross stitch, the yet to be sewed summer top and the pile of wool waiting to be knitted. That's the plan anyway.
I've started fairly well with this colourful crochet mandala and although it wasn't technically in progress before January, it's been at the back of my mind for months. It's in the colours of our living room, blues, navy, whites, yellows and the grey to tone it down a bit. It's actually to replace the one I made last year, which although lovely, doesn't match the living room so it'll find a new home elsewhere. As you can see from the picture I'm trying to make the effort to block more of my makes even though it's so tempting to use them straight away, another little resolution.


Along with the crochet I've just started reading Big Magic by Elizabeth Gilbert, having seen lots of hype around it I was pretty sure I was going to love it. So far it has not disappointed. Her thoughts on fear and courage in creativity are certainly ones I'll be reminding myself of throughout the year. I've just started the chapter on ideas as independent from us, not something we come up with, but something that chooses us and we must respond to... all very interesting!
What have you been making and reading?
Joining in with Ginny's Yarn Along.
TWITTER | BLOGLOVIN' | PINTEREST | INSTAGRAM | RSS
A super easy no bake snack
Hands up, who else vowed to eat a bit more healthily as part of their new year’s resolutions? And who’s already getting sugar cravings? Yeah, me too *sobs*. But don’t despair, before you reach for that forbidden chocolate bar, give these healthy honey oat bars a try. They’re packed with filling oats and almonds with sweet honey, cranberries and peanut butter to satisfy even the sweetest tooth.
You can whip them up in no time (did I mention they’re no bake?) and keep them in the fridge for when you need a pick me up. They have replaced my usual afternoon chocolate snack, which I’m not even missing. The oats make them nice and filling, while the peanut butter and nuts add some protein and healthy fats.
I can’t take the credit for these; they are the boyfriend’s creation after a good browse of other healthy snack recipes. But I thought it was only fair to share the recipe with you, they’re too good to keep to ourselves! Plus to keep things interesting you can alternate the cranberries and pumpkin seeds with any dried fruit and nuts you fancy.
Ingredients
Honey 100g
Crunchy low sugar/salt peanut butter 80g
Almonds 60g
Dried cranberries 40g
Pumpkin seeds 30g
Rolled oats 120g
Method
Line a small baking tray or plastic container with greaseproof paper.
Mix the honey and peanut butter together to form a paste. Then stir in the almonds, cranberries, pumpkin seeds and rolled oats. Be sure to fold the mixture as well as stir until it starts to stick together.
Transfer the mixture your baking tray, flatten and fill into corners. Then leave in fridge for at least an hour.
When chilled, slice into bars and remove from the tray. Store in fridge.
What fruit and nuts would you add?
TWITTER | BLOGLOVIN' | PINTEREST | INSTAGRAM | RSS
Seeing as the big day is now over for another year it's safe to share a couple of the Christmas gifts I made. I originally decided to focus on making decorations rather than gifts for Christmas this year, but forgot all about that promise when I saw this knitted slipper pattern in on ravelry. I knew my Mum would just love the style and giant pom-pom, plus I already had the perfect yarn in my stash so I couldn't resist!
They were really easy to knit and would make a great pattern for beginners as the only stitches used are knit, increase and knit two together. The sizing on the pattern is also really accurate, which is always a bonus, my Mum is a UK size 5 and they're a good fit - not too loose, not to tight. You knit them in one flat piece with a triangle section for the heel and as you cast off, you gather the remaining front stitches to create the toe. Then you simply sew the heel together and add a nice fluffy pom-pom for the finishing touch. I used the largest of my trusty pom-pom makers, although you could by a faux fur pom-pom as they have done in the pattern.
The yarn used is Chunky Special by Stylecraft in burgundy and as you knit with the yarn held double, they are super warm and will hopefully last that bit longer too. The burgundy colour has a lovely warming feel to it perfect for cold winter evenings. I'm quite tempted to make a pair for myself now. And it’s an excuse to make more pom-poms!
Of course once I'd made something for my Mum, I figured I'd also make something for my Dad... catch that in next week's post.
p.s. I never really got round to making many Christmas decorations. Oops.
p.p.s. #worldpomination
TWITTER | BLOGLOVIN' | PINTEREST | INSTAGRAM | RSS
Four crochet makes to inspire
If you asked me to sum up 2015 in one craft it would be crochet, without a shadow of a doubt. I spent the year working on the crochet granny square basics I learnt in 2014 and my knitting needles definitely took a back seat. You could even say I was hooked… (sorry!).
Over the course of the year I made several gifts and several things for me and the home, and in all honesty surprised myself by actually managing to complete them. Various YouTube videos and tutorials came to the rescue at times but as you can see in the crochet phone case post - by the end of the year I was able to write my own (very simple) pattern! Blog reading and writing is completely to thank for giving me the confidence to keep making things and start coming up with patterns. And for this I’m immensely grateful.
Anyway before you have to pass me the tissues, here’s the round-up of my favourite crochet makes from 2015, in no particular order…
1. African flower cushion
2. Crochet Toothless from How to Train your Dragon
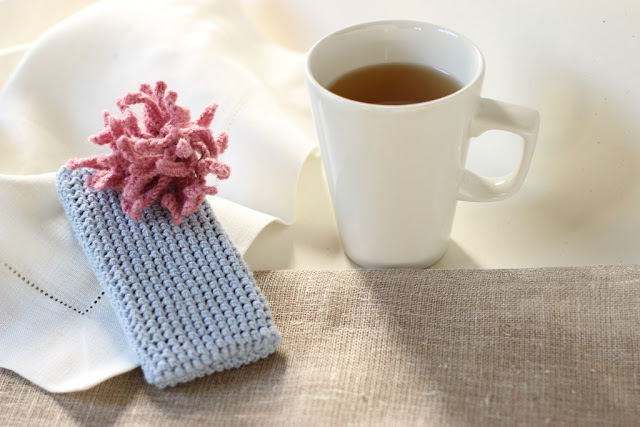
3. Crochet phone case
3. Crochet giraffe
Which is your favourite?
Crochet plans for the New Year
As ever my projects list is never ending, whose isn’t? But unless I get distracted in between (which is entirely possible) my first two planed makes will be another mandala using the pattern from Mollie Makes issue 54 in colours to match our living room and a colourful blanket for the craft room. Although I can’t decide exactly what kind of blanket yet granny, harlequin, ripple - there are so many to choose from!
Take a look at my pinterest board if you’re in need of some more crochet inspiration for 2016.
Happy New Year!
TWITTER | BLOGLOVIN' | PINTEREST | INSTAGRAM | RSS